
Family photo analysis

|

|
The biggest difference between both photos is the way in which each was taken. For example, the first photo has clearly been taken professionally which is evident because of the use of the back drop and the attention paid to lighting. Whereas in the second photo it has been taken using a camera phone which is clear to the "cramming in" of subjects and the lack of attention to detail. Also the subjects eyes are not looking toward the camera but rather the screen of the phone so they can see their expression.
In both images the positioning of the models isn't based on gender but more on size, with the largest people being placed at the back. The clothes worn by the models aren't that different compared to that of the clothes worn by the models in the second photo. This suggests that the two photos weren't taken too far apart. Once again in both photos all the models are smiling which suggests that the camera used was a modern one which meant the models didn't have to stay in the same position for too long.
After asking the owner of the photos i have learned that for her the photo on the right is more precious to her. This is because she felt that a memory was attached to the photo and that it was rather evident that in the photo the subjects are enjoying themselves and having fun. When she looks at the photo a smile is brought to her face as she remembers the joy she felt when the photo was taken unlike the photo on the right which seems as though it has no identity.
Early history of Photography
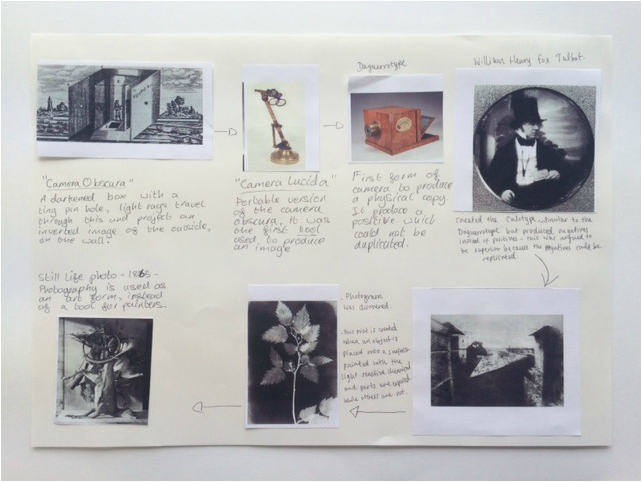
Photography was originally used by artists to create an outline on which they could paint an image on to, in order to get an accurate documentation of the outside world. Artists then began to use photography to take still life photos to express ideas and feeling, instead of a tool for painters. It was at this point that photography began to make itself known as an art form.
Making a Camera Obscura
A camera obscura is essentially the original from of photography, it is technically a darkened box or room with a very small hole in one side of the room. As light rays pass through the small hole they produce an inverted image of the outside world on the wall. The camera obscura is said to be used by the artist Caravaggio, who darkened his studio to help him concentrate on is painting. It was used during the renaissance period by artists as realism was very popular at the time and this helped them achieve it.
To make my camera obscura i used cardboard to make a box with one open end. I covered the corners and edges of the box with as much duct tape as possible in order to reduce the amount of light coming through so it would give a clearer image.i then cut a small hole in the opposite side to the open end and then covered it with a magnifying glass, securing it in place with more duct tape. I then used the cardboard from the open end and cut out the middle leaving about an inch around the edge. I then covered with tracing paper which the image was then projected on to.
When using my camera obscura i was given multiple items of which to take a photo. These included; a classmate (portrait), a view from a window, a light source and a corner pointing towards us.
Experimenting with light exposure
Shutter Speed


Examples of shutter speed being used effectively from Pintrest
|

|
Aperture


Examples of aperture being used from Pintrest
|
|
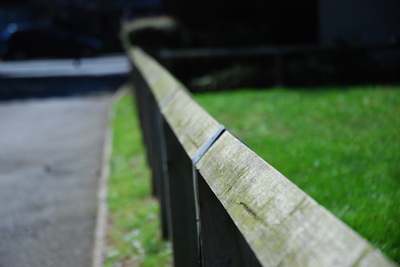
When using our cameras we had to manually adjust our aperture settings which determines how much light the film is exposed to by changing the size of the hole. Aperture is measured in F-stops and the smaller the F-stop the larger the hole, therefore the more light exposure. By manually adjusting our aperture we are able to adjust the depth of field and have certain parts of the image in focus where other parts are not. This can be seen in the image of the railing in our school where the image loses focus the farther down the railing the image gets.

|
We also experimented with adjusting the shutter speed settings on our cameras. Faster shutter speeds are often used by sports photographers who want to capture crisp images of footballers and race cars etc. while they are still moving very fast. We however chose to use a much slower shutter speed in order to capture the image of someone in the air, with their legs blurry with a crisp back ground.
|
